
Vue
笔记来自 黑马程序员
选项式 vs 组合式
<script>
export default {
    data() {
        return {
            count: 0,
        };
    },
    methods: {
        addCount() {
            this.count++;
        },
    },
};
</script><script setup>
import { ref } from "vue";
const count = ref(0);
const addCount = () => count.value++;
</script>特点:
- 代码量变少;
- 分散式维护变成集中式维护。
create-vue 搭建项目
create-vue
create-vue是Vue官方新的脚手架工具,底层切换到了vite(下一代前端工具链),为开发提供极速响应
使用 create-vue 创建项目
前置条件 - 已安装
16.0或更高版本的Node.js
执行如下命令,这一指令将会安装并执行 create-vue
npm create vue@latest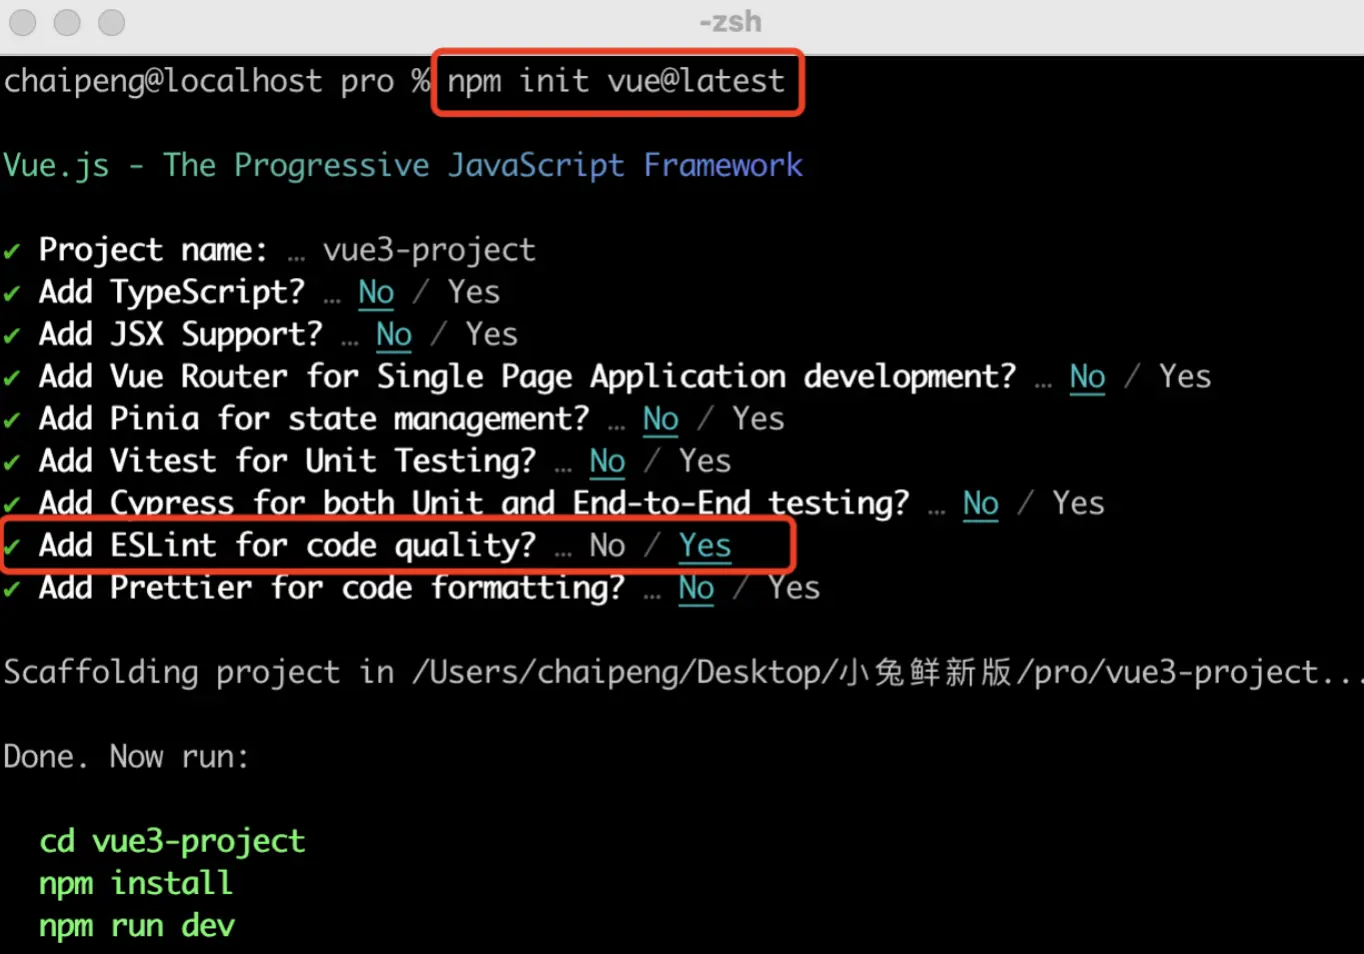
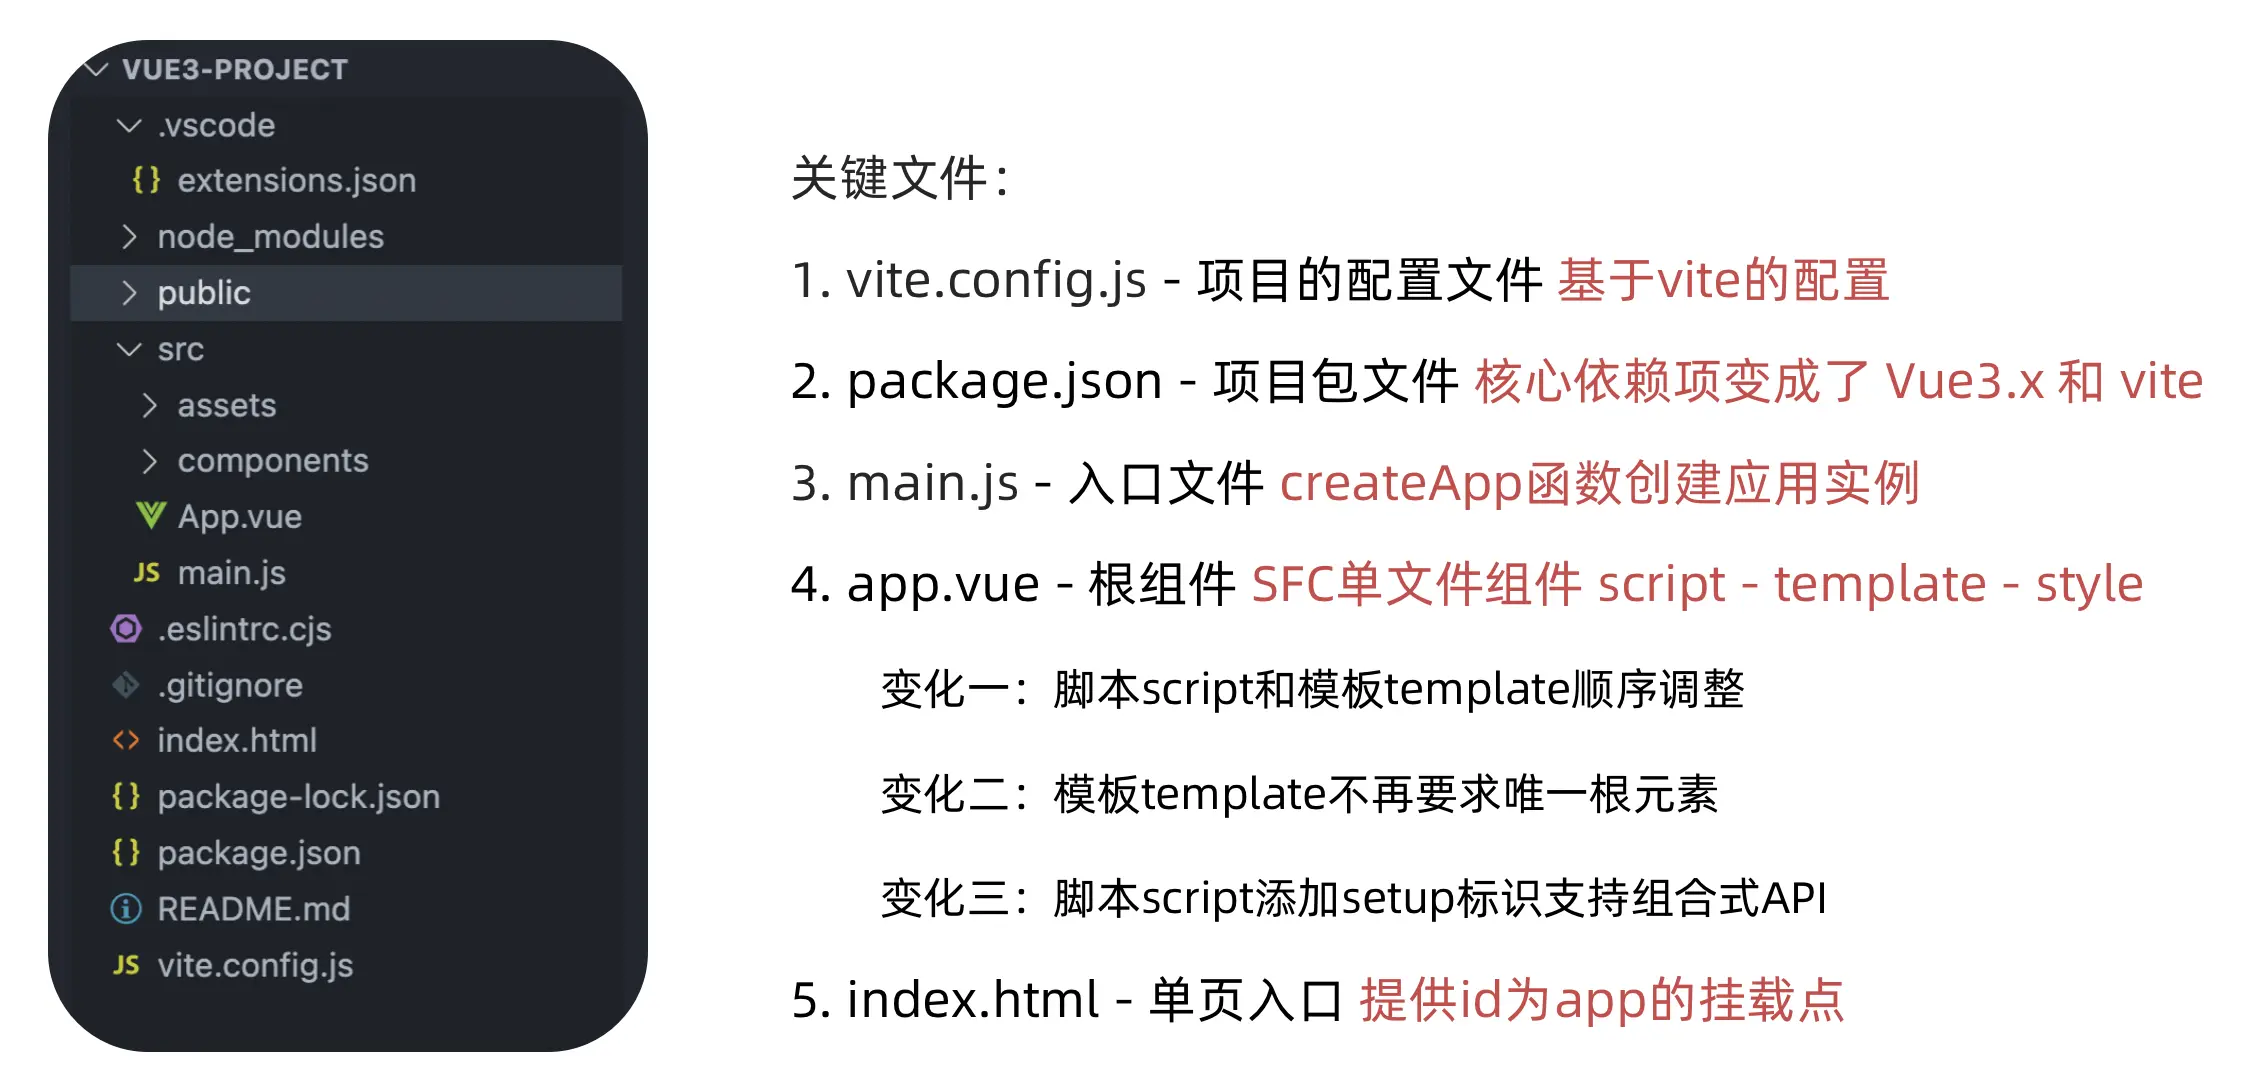
熟悉项目和关键文件
setup 选项
setup 选项的写法和执行时机
写法
<script>
export default {
setup() {},
beforeCreate() {},
};
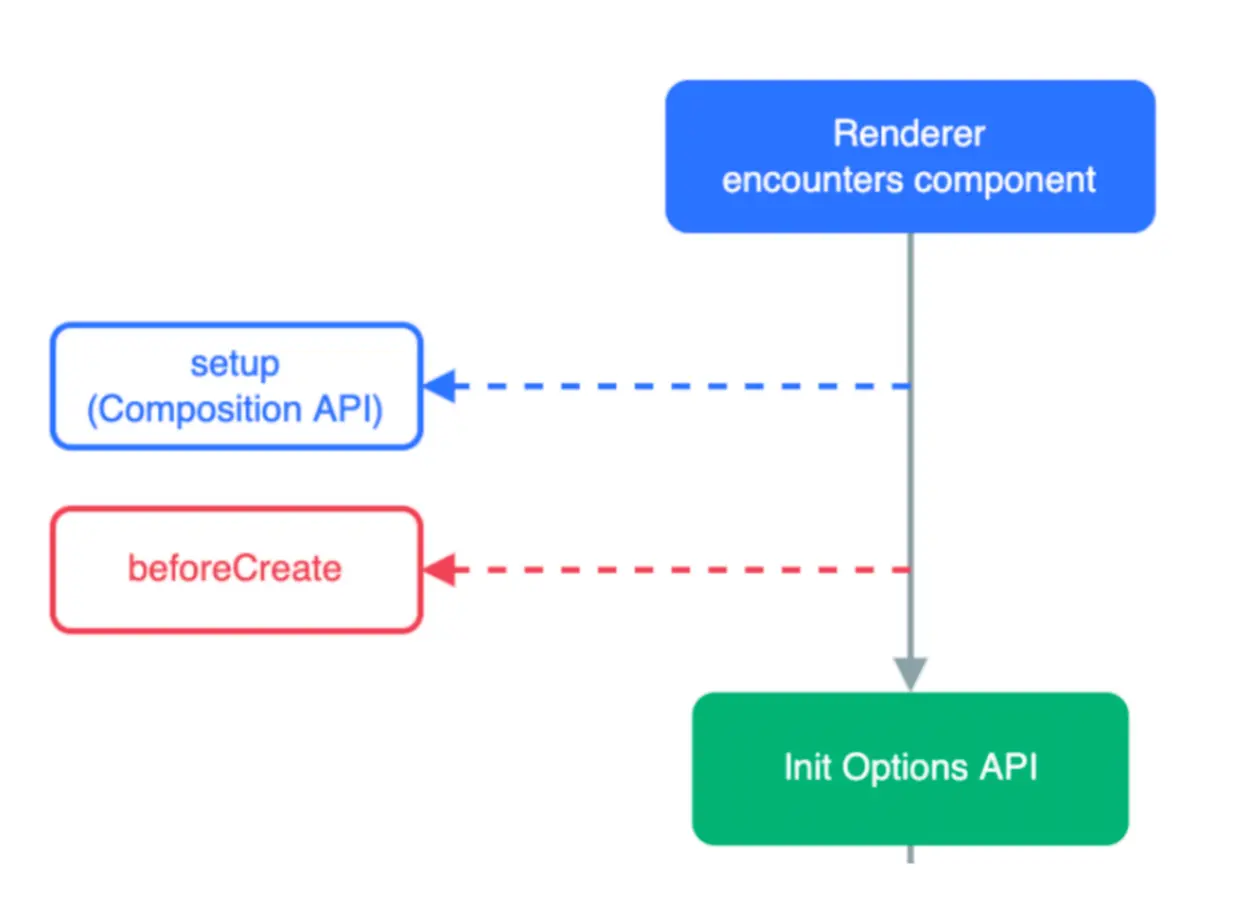
</script>执行时机
在
beforeCreate钩子之前执行
setup 中写代码的特点
在
setup函数中写的数据和方法需要在末尾以对象的方式return,才能给模版使用
<script>
export default {
    setup() {
        const message = "this is message";
        const logMessage = () => {
            console.log(message);
        };
        // 必须return才可以
        return {
            message,
            logMessage,
        };
    },
};
</script>
<script setup> 语法糖
script标签添加setup标记,不需要再写导出语句,默认会添加导出语句
<script setup>
const message = "this is message";
const logMessage = () => {
    console.log(message);
};
</script>
reactive 和 ref 函数
reactive
接受对象类型数据的参数传入并返回一个响应式的对象
<script setup>
// 导入
import { reactive } from "vue";
// 执行函数 传入参数 变量接收
const state = reactive({
    msg: "this is msg",
});
const setSate = () => {
    // 修改数据更新视图
    state.msg = "this is new msg";
};
</script>

<template>
    {{ state.msg }}
    <button @click="setState">change msg</button>
</template>
ref
接收简单类型或者对象类型的数据传入并返回一个响应式的对象
<script setup>
// 导入
import { ref } from "vue";
// 执行函数 传入参数 变量接收
const count = ref(0);
const setCount = () => {
    // 修改数据更新视图必须加上.value
    count.value++;
};
</script>

<template>
    <button @click="setCount">{{ count }}</button>
</template>
reactive 对比 ref
都是用来生成响应式数据
不同点
reactive不能处理简单类型的数据ref参数类型支持更好,但是必须通过.value做访问修改ref函数内部的实现依赖于reactive函数
在实际工作中的推荐
- 推荐使用
ref函数,减少记忆负担。
- 推荐使用
computed
<script setup>
// 导入
import { ref, computed } from "vue";
// 原始数据
const count = ref(0);
// 计算属性
const doubleCount = computed(() => count.value * 2);

// 原始数据
const list = ref([1, 2, 3, 4, 5, 6, 7, 8]);
// 计算属性list
const filterList = computed((item) => item > 2);
</script>
watch
侦听一个或者多个数据的变化,数据变化时执行回调函数,俩个额外参数
immediate控制立刻执行,deep开启深度侦听
侦听单个数据
<script setup>
// 1. 导入watch
import { ref, watch } from "vue";
const count = ref(0);
// 2. 调用watch 侦听变化
watch(count, (newValue, oldValue) => {
    console.log(`count发生了变化,老值为${oldValue},新值为${newValue}`);
});
</script>
侦听多个数据
侦听多个数据,第一个参数可以改写成数组的写法
<script setup>
// 1. 导入watch
import { ref, watch } from 'vue'
const count = ref(0)
const name = ref('cp')
// 2. 调用watch 侦听变化
watch([count, name], ([newCount, newName],[oldCount,oldName])=>{
  console.log(`count或者name变化了,[newCount, newName],[oldCount,oldName])
})
</script>
immediate
在侦听器创建时立即出发回调,响应式数据变化之后继续执行回调
<script setup>
// 1. 导入watch
import { ref, watch } from "vue";
const count = ref(0);
// 2. 调用watch 侦听变化
watch(
    count,
    (newValue, oldValue) => {
        console.log(`count发生了变化,老值为${oldValue},新值为${newValue}`);
    },
    {
        immediate: true,
    }
);
</script>
deep
通过watch监听的ref对象默认是浅层侦听的,直接修改嵌套的对象属性不会触发回调执行,需要开启deep
<script setup>
// 1. 导入watch
import { ref, watch } from "vue";
const state = ref({ count: 0 });
// 2. 监听对象state
watch(state, () => {
    console.log("数据变化了");
});
const changeStateByCount = () => {
    // 直接修改不会引发回调执行
    state.value.count++;
};
</script>

<script setup>
// 1. 导入watch
import { ref, watch } from "vue";
const state = ref({ count: 0 });
// 2. 监听对象state 并开启deep
watch(
    state,
    () => {
        console.log("数据变化了");
    },
    { deep: true }
);
const changeStateByCount = () => {
    // 此时修改可以触发回调
    state.value.count++;
};
</script>
生命周期函数
选项式对比组合式
| 选项式API | 组合式API |
|---|---|
| beforeCreate/created | setup |
| beforeMount | onBeforeMount |
| mounted | onMounted |
| beforeUpdate | onBeforeUpdate |
| updated | onUpdated |
| beforeUnmount | onBeforeUnmount |
| unmounted | onUnmounted |
生命周期函数基本使用
- 导入生命周期函数
- 执行生命周期函数,传入回调
<script setup>
import { onMounted } from "vue";
onMounted(() => {
    // 自定义逻辑
});
</script>
执行多次
生命周期函数执行多次的时候,会按照顺序依次执行
<script setup>
import { onMounted } from "vue";
onMounted(() => {
    // 自定义逻辑
});

onMounted(() => {
    // 自定义逻辑
});
</script>
父子通信
父传子
- 父组件中给子组件绑定属性
- 子组件内部通过
props选项接收数据
父组件
<script setup>
//引入子组件
import sonComVue from "./son-com.vue";
</script>

<template>
    <!--1.绑定属性 message -->
    <sonComVue message="this is app message" />
</template>
子组件
<script setup>
//2.通过defineProps“编译器宏”接收子组件传递的数据
const props = defineProps({
    message: String,
});
</script>

<template>
    {{ message }}
</template>
子传父
- 父组件中给子组件标签通过
@绑定事件- 子组件内部通过
emit方法触发事件
父组件
<script setup>
// 引入子组件
import sonComVue from './son-com.vue"
const getMessage = (msg) =>{
  console.log(msg)
}
</script>

<template>
    <!-- 1.绑定自定义事件 -->
    <sonComVue @get-message="getMessage" />
</template>
子组件
<script setup>
// 2.通过defineEmits编译器宏生成emit方法
const emit = defineEmits(['get-message'])
const sendMsg = () => {
    // 3.触发自定义事件并传递参数
    emit('get-message', 'this is son msg')
}
</script>

<template>
    <button @click="sendMsg">sendMsg</button>
</template>
模版引用
概念:通过
ref标识 获取真实的dom对象或者组件实例对象
基本使用
实现步骤:
- 调用
ref函数生成一个ref对象 - 通过
ref标识绑定ref对象到标签
<script setup>
import { ref } from "vue";
// 1. 调用ref函数得到ref对象
const h1Ref = ref(null);
</script>

<template>
    <!-- 2. 通过ref标识绑定ref对象 -->
    <h1 ref="h1Ref">我是dom标签h1</h1>
</template>
defineExpose
默认情况下在
<script setup>语法糖下组件内部的属性和方法是不开放给父组件访问的,可以通过defineExpose编译宏指定哪些属性和方法容许访问
说明:指定testMessage属性可以被访问到
<script setup>
import { ref } from "vue";
const testMessage = ref("this is test msg");
defineExpose({
    testMessage,
});
</script>
provide 和 inject
作用和场景
顶层组件向任意的底层组件传递数据和方法,实现跨层组件通信
跨层传递普通数据
实现步骤:
- 顶层组件通过
provide函数提供数据 - 底层组件通过
inject函数提供数据
顶层组件
provide('key', "顶层组件中的数据")底层组件
const message = inject("key");TIP
key 需要相同。
跨层传递响应式数据
顶层组件
provide('key', "ref对象")底层组件
const message = inject("key");在调用
provide函数时,第二个参数设置为ref对象
跨层传递方法
顶层组件可以向底层组件传递方法,底层组件调用方法修改顶层组件的数据
顶层组件
const setCount = () => {
    count.value++;
};

provide("setCount-key", setCount);
底层组件
const setCount = inject("setCount-key");defineOptions
背景说明:
有<script setup> 之前,如果要定义 props,emits 可以轻而易举地添加一个与 setup 平级的属性。但是用了 <script setup> 后,就没法这么干了 setup 属性已经没有了,自然无法添加与其平级的属性。
为了解决这一问题,引入了defineProps 与 defineEmits 这两个宏。但这只解决了 props 与 emits 这两个属性。如果我们要定义组件的 name 或其他自定义的属性,还是得回到最原始的用法——再添加一个普通的 <script> 标签。这样就会存在两个 <script> 标签。让人无法接受。
所以在Vue 3.3 中新引入了 defineOptions 宏。顾名思义,主要是用来定义 Options API 的选项。可以用 defineOptions 定义任意的选项, props,emits,expose,slots 除外(因为这些可以使用 defineXXX 来做到)
<script setup>
defineoptions({
    name: "Foo",
    inheritAttrs: false,
    // ...更多自定义属性
});
</script>
defineModel
在 Vue3 中,自定义组件上使用 v-model, 相当于传递一个 modelValue 属性,同时触发 update:modelValue 事件
<Child v-model="isVisible" />
// 相当于
<Child :modelValue="isVisible" @update:modelValue="isVisible = $event" />
我们需要先定义 props,再定义 emits 。其中有许多重复的代码。如果需要修改此值,还需要手动调用 emit 函数。
于是乎 defineModel 诞生了。
<script setup>
const modelValue = defineModel();
modelValue.value++;
</script>
生效需要配置 vite.config.js
import { fileURLToPath, URL } from "node:url";

import { defineConfig } from "vite";
import vue from "@vitejs/plugin-vue";

// https://vitejs.dev/config/
export default defineConfig({
    plugins: [
        vue({
            script: {
                defineModel: true,
            },
        }),
    ],
    resolve: {
        alias: {
            "@": fileURLToPath(new URL("./src", import.meta.url)),
        },
    },
});
Pinia 状态管理
什么是 Pinia
Pinia 是 Vue 的专属的最新状态管理库 ,是 Vuex 状态管理工具的替代品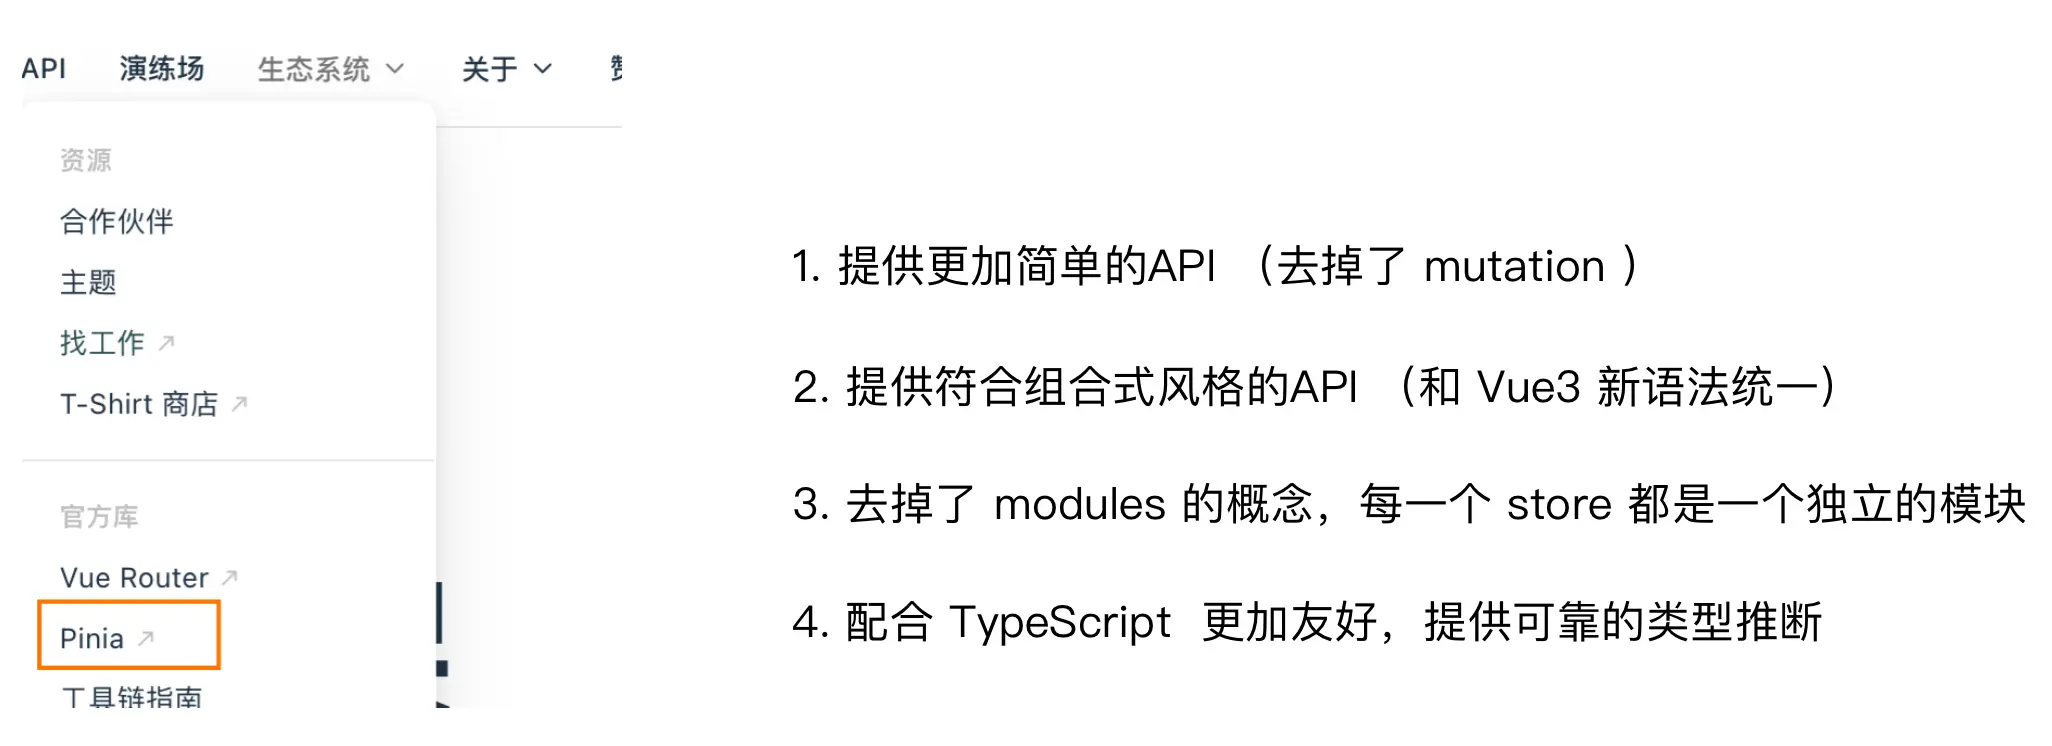
添加 Pinia 到 Vue 项目
后面在实际开发项目的时候,Pinia 可以在项目创建时自动添加,现在我们初次学习,从零开始:
- 使用 Vite 创建一个空的 Vue3项目
npm add vite@latest- 按照官方文档安装
pinia到项目中
Pinia 基础使用
- 定义
store - 组件使用
store
定义 Store (state + action)
import { ref, computed } from "vue";
import { defineStore } from "pinia";

export const useCounterStore = defineStore("counter", () => {
    const count = ref(0);
    const doubleCount = computed(() => count.value * 2);
    function increment() {
        count.value++;
    }

    return { count, doubleCount, increment };
});
组件使用 Store
<script setup>
// 1.导入useCounterStore方法
import { useCounterStore } from "@/stores/counter";
// 2.执行方法得到counterStore对象
const counterStore = useCounterStore();
</script>

<template>
    <button @click="counterStore.increment">
        {{ counterStore.count }}
    </button>
</template>
getters 实现
Pinia 中的 getters 直接使用 computed 函数 进行模拟,组件中需要使用需要把 getters return 出去
// 数据(state)
const count = ref(0);

// getter

const doubleCount = computed(() => count.value * 2);
action 异步实现
方式:异步 action 函数的写法和组件中获取异步数据的写法完全一致
- 接口地址:http://geek.itheima.net/v1_0/channels
- 请求方式:
get - 请求参数:无
// 异步action
const getList = async () => {
    const res = (await axios.request) < 接口数据类型 > {};
};
需求:在 Pinia 中获取频道列表数据并把数据渲染 App 组件的模板中
storeToRefs 工具函数
使用 storeToRefs 函数可以辅助保持数据(state + getter)的响应式解构
// 响应式丢失视图不再更新
const { count, doubleCount } = counterStore;

// 保持数据响应式
const { count, doubleCount } = storeToRefs(counterStore);
Pinia的调试
Vue 官方的 dev-tools 调试工具对 Pinia 直接支持,可以直接进行调试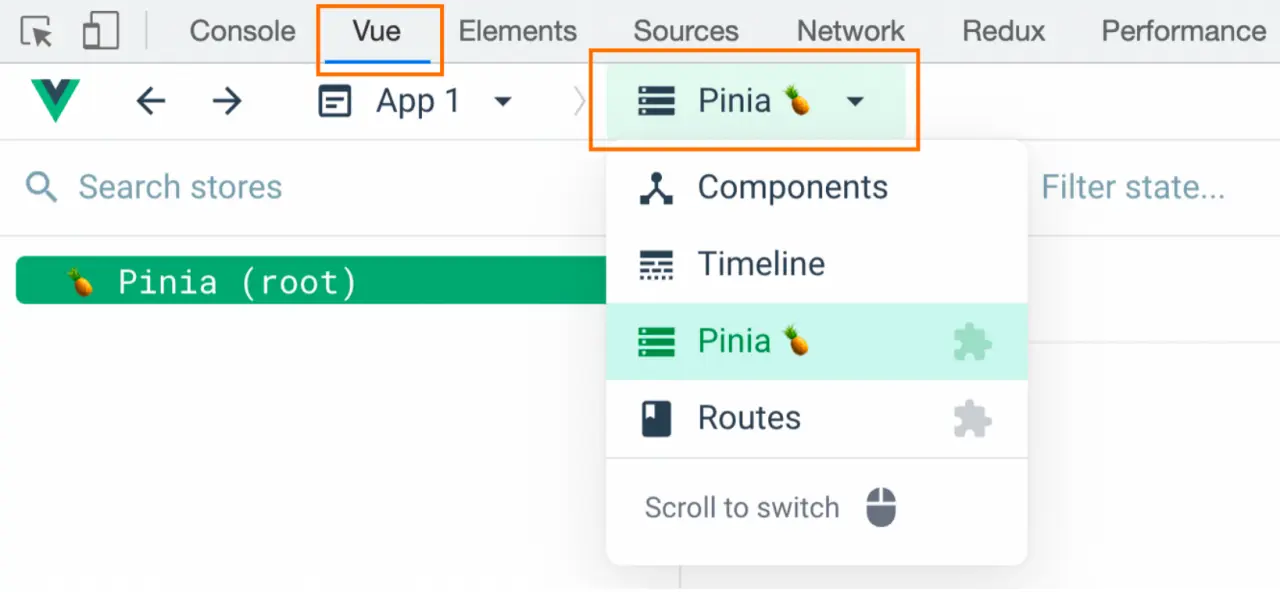
Pinia持久化插件
官方文档:https://prazdevs.github.io/pinia-plugin-persistedstate/zh/
安装插件
pinia-plugin-persistedstateshellnpm add pinia-plugin-persistedstate使用
main.jsjsimport persist from "pinia-plugin-persistedstate"; // ... app.use(createPinia().use(persist));配置
store/counter.jsjsimport { defineStore } from "pinia"; import { computed, ref } from "vue"; export const useCounterStore = defineStore( "counter", () => { // ... return { count, doubleCount, increment, }; }, { persist: true, } );其他配置,看官网文档即可